Featured

Business Central and Microsoft Flow: “The Good, the Bad and the Ugly”.

Microsoft is pushing hard on the Dynamics community to lean towards Microsoft Flow and try to replace custom coding by leveraging the Power Platform. To achieve this they rebuild the Microsoft Flow connector for business central (cloud), based on the out-of-the-box API. I had some the first projects where we took the opportunity and try to leverage flow. Below are the things I’ve learned along the way.

I’ll flip the sequence so we can end this post on a positive note 😉

The bad

Let’s start with the stuff that just doesn’t work. The BC connector contains some line tables:

  • SalesQuoteLines
  • SalesOrderLines
  • SalesInvoiceLines
  • PurchaserOrderLines
  • PurchaseInvoiceLines

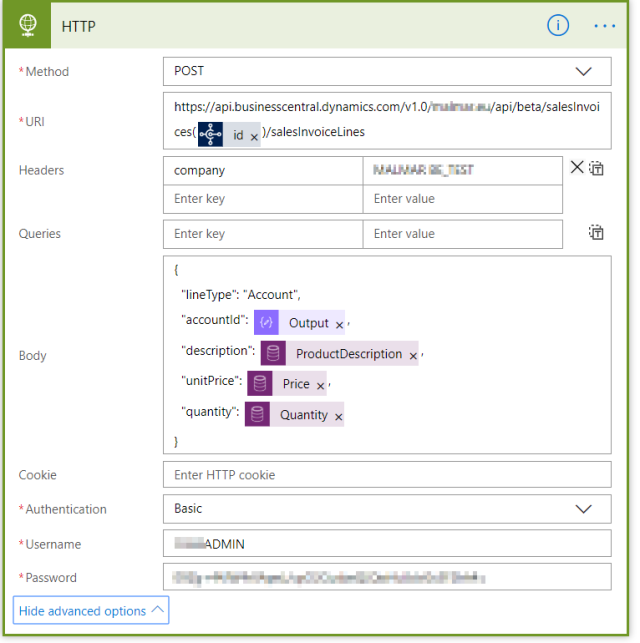
One would assume you can specify the header (parent) record inside the Flow step to attach the lines towards the parent record… sadly this is not the case.  When we look at the API docs we can see that the DocumentID field should be used to pass the GUID of the parent record. The DocumentID field however is not present in the SalesInvoiceLines entity.

Flow-parent-missing

This renders the connector useless in complex business scenario’s and questions the level of detail put into the creation of this connector.

How can we fix this situation? By splitting the creation into two separate steps:

First, create the Sales (Invoice) header from the default BC connector:

Flow-create-invoice-header

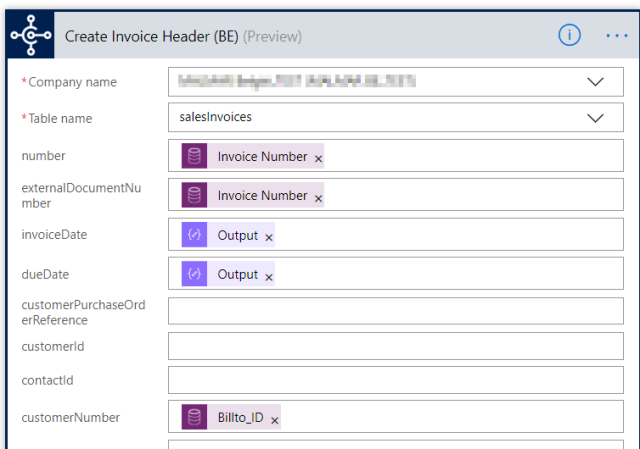
Afterwards we call the standard API from the Flow HTTP connector and provide the DocumentID (GUID link towards the parent header) from the previous step inside the request URL.

Flow-create-invoice-HTTP

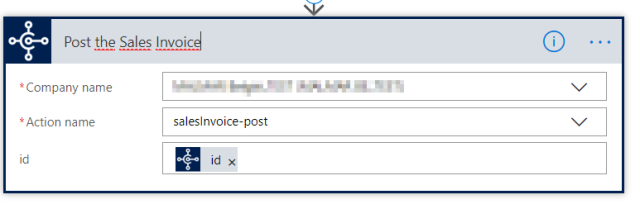
This will create a new invoice with some G/L entry type lines. You finish by using the ‘Execute Action’ step to post the invoice by passing the id from the newly created Invoice header.

Flow-create-invoice-post

The ugly

Syncing customers between Business Central companies

So child-parent entities are a no-go. Let’s try the more simple stuff, like using Microsoft Flow to re-create a customer inside multiple companies inside the Business Central tenant.

So we start by using the ‘When a record is created’ trigger in combination with the ‘Customer’ table:

Flow-sync-customer-created

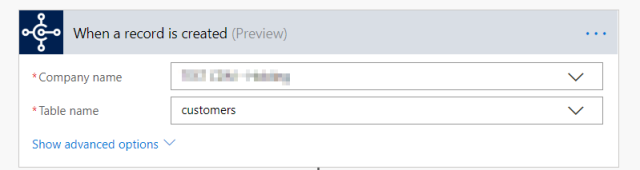
Here we encounter the first problem. In Business Central the ‘record’ is created instantly when the Customer No is defined and committed towards the database. So the Flow event is fired and only contains the newly created Customer No. A downside of not having a save button inside Business Central…

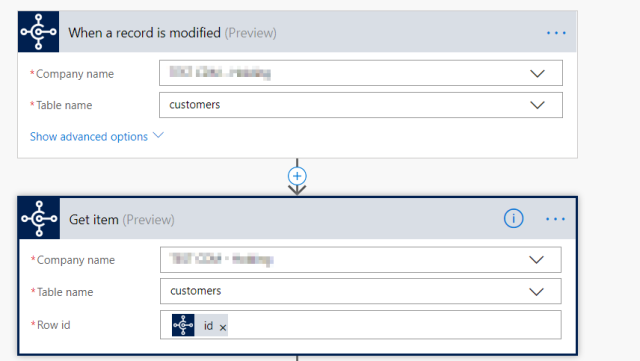
So we have the customer number in for our synced Customer, but we need the other fields as well. So we can fall back on the ‘When a record is modified’ trigger and look for updates on our Customer card to sync this towards our other company.

Flow-sync-customer-modified

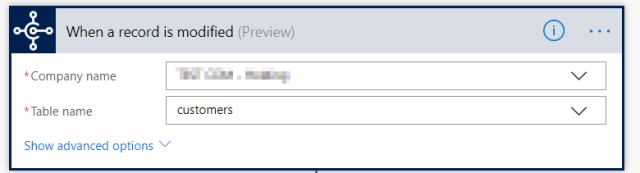
Second problem arises here, the output from the modified step is for some strange reason only a fraction from the data stored on the customer in the database. I speculate on this by assuming the record only contains the modified fields, but this was some hit and miss in my testing.

To fix this we receive the record again by pulling the record using the ‘Get Item’ trigger. Our Flow now contains these two steps to get the complete Customer record.

Flow-sync-customer-get

We now can sync customer data between multiple BC companies. But darn we are missing some important fields that are not published on the standard API customer page.

This takes us towards the third problem:

Extending the customer API fields in Business Central

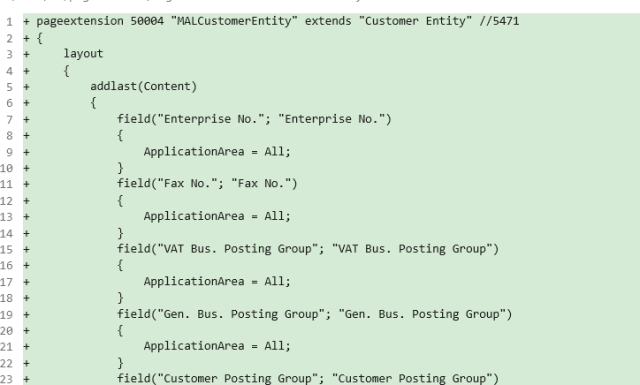
The API in business central consists of some specific pages that contain the default published fields, in our example the ‘Customer’ record is using the ‘Customer entity’  (5471) page. So like all pages inside BC we can create a page extension and add the missing fields.

Flow-custom-fields-API

It would be super neat if these fields would show up in the Flow connector once we extend the page. It doesn’t… in fact it get worse. Extending the default API pages breaksthe Flow connector:

Flow-custom-fields-default-error

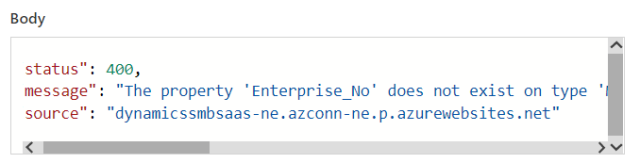
So back to square one.. . I’ve brought this ‘feature’ to the attention of Microsoft and the claim this is by design. I quote ‘we want to keep the API pages the same for all tenants, the solution is to create your own ‘Customer’ API page’. The fact that we can’t see custom API pages inside the flow connector is a minor setback.

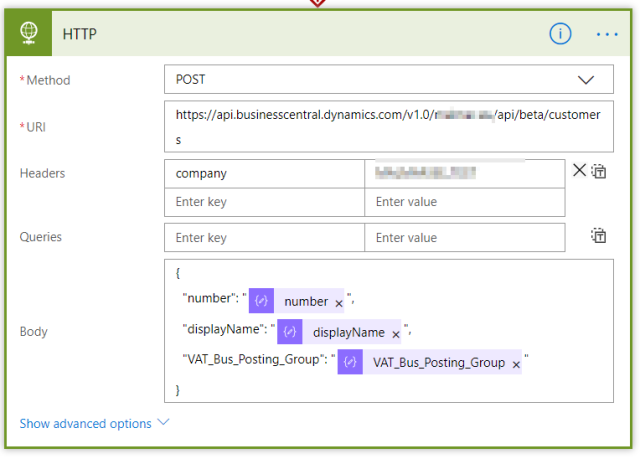
The fix? Once again resulting towards the HTTP action in Flow in combination with a custom customer API page.

Flow-custom-fields-default-http

The good

So in conclusion, the Microsoft Flow connector for Business central is holding its ‘preview’ badge with pride. There is a lot of work to be done to leverage the power of Microsoft Flow and use it in a meaningful way. Let’s not get deviated by the current limitations for the obvious potential, I am a huge Flow believer and expect this issues to get solved in the distant future.

In the meantime,  the Parse JSON and HTTP connectors will become your new Flow friends.

More information about the Business Central API can be found at https://docs.microsoft.com/en-us/dynamics-nav/fin-graph/


Featured

Functionality Improvements in NAV 2018 – Part 1

What’s new in Microsoft Dynamics NAV 2018

Yesterday we had the general release of Microsoft Dynamics 2018, ‘the one that wasn’t until it was’. In this post we’ll have a look at the new functionalities in the RTC environment. I’ll do a follow a post discussing the changes in the webclient.

User Tasks

Right on the Dynamics NAV 2018 role center we have a new tile pointing us towards one of the new features: User tasks.

User Task Tile

These user tasks are one-off or recurring task assigned on specific NAV users. These task consist of some planning fields (start and ending date), priority and the task item. Task items can be NAV pages (e.g. the Item list) or reports that are important in the context of the created task.

User Task Main

There is a missed opportunity to make this more context aware, let’s say point toward a specific item or customer (likes the notes functionality). We do howerver have the possibility to set a recurrence on the task so we can have the action perfom for example once a month.

User Task Recurrence

Applying this recurrence will create duplicates of the task with a start date defined by the recurrence parameter.

Item Charge Assignment

One of the more common request for changes in prior versions of NAV was the possibility to have the Item Charge assignment a bit more flexible. Microsoft closed this gap by enabling Item Charge assignment on Weight and Volume in NAV 2018. A welcome addition.

Item Charge

Purchase order from Sales Order

This seems like one of those features that should have been there for ages now, but finally Microsoft provided a possibility to create a Purchase order from a Sales Order.

Purchase order

There is no reservation entry created between the two documents, so it’s more like a shortcut for the requisition worksheet. Technically this is exactly what is happening behind the curtain, a requisition line is created and carried out. Before this triggers, you can change the vendor and purchase quantity on the fly inside the new Create Purchase order screen.

Purchase order2

Employee ledger – new Account Type

There is a new account type available in the general journal: ‘Employee’. This will enable you to post employee related costs towards a pre-defined G/L account.

Employee Account Type

On the employee card we have a new field called ‘Employee Posting Group’. Here we can define a posting group that is linked towards a specific G/L account for this employee.

Empoyee Posting

This group is linked towards a specific G/L account:

Empoyee Posting Detail

This setup resembles the ‘bank account’ setup and is quite straightforward.

Edit posting setup from list screen

This one will go high on the award ‘feature of the year’: editing the posting setup from within the list screen. No more repetitive hours clicking through card pages, this could be the sole reason to upgrade.

Posting Setup

Various changes

  • Microsoft Dynamics CRM references are changes towards Microsoft Dynamics 365 for Sales. The synchronisation interface can be run in background.
  • Contextual PowerBI reports
  • Microsoft Flow Integration (I will create a separate post on this one)
  • Intercompany setup simplified
  • Synchronize Vendors with Lexmark ICS

Issues

I’m not sure if it’s a bug or a feature, but I can select all available language packs inside NAV2018.

Languages

5 must-have end-user features from Business Central 2019 Release Wave 2

Business Central release wave 2 contains massive changes in the underlying platform architecture. There are a lot of blogs detailing this epic technical undertaking, so start by checking out the official blog detailing the plans at https://cloudblogs.microsoft.com/dynamics365/it/2019/08/09/introducing-the-dynamics-365-business-central-system-application/

On the surface we can sum up the changes all in the category ‘it’s all in the little things’.

1. Enhanced user personalization

Dynamics NAV always had a lot of user personalization options. Business central is continuing on this path by introducing these inside the web client so you can really make the application feel your own. Release wave 2 will allow you to resize columns by simply dragging the boundary of the column header. Similar to Excel, double-click to auto fit to the best width.

BC-Wave2-resize

A second enhancement on the user personalization front is the ability to personalize actions on your Role Center by moving them to another position, hiding them away, or regrouping them. Similarly, the navigation menu becomes fully customizable for your needs.

BC-Wave2-rc

2. Save and personalize list views

Users can now save filters in the filter pane as a list view with a recognizable name, all based on Save a new list view with custom filters on specific fields, on totals, and other calculated fields. You can apply the full spectrum of filter expressions, ranges, and new handy filter tokens (such as %MyCustomers) to dynamically filter to the right data.

BC-Wave2-filters

Additionally, a new multi-selection control in filters for fields of type Option so you can filter on by multiple values. The used of this filter is treated as an OR operation on the selected column.

BC-Wave2-filters2

3. Keyboard shortcut support

Dynamics NAV power user always relied heavily on the user of keyboard shortcuts to speed up data entry and launch frequent used actions. Among others, the broadly used keyboard shortcut is F9 for posting a document has returned in this version. For a full list of keyboard shortcuts check https://go.microsoft.com/fwlink/?LinkId=2064754

4. Multitask across pages

Starting this release, users can open several pages at the same time to perform multiple tasks in different browser tabs or windows. When a user has several browser windows open, each is acting as another connection or session. You can use these browser tabs on different monitors to speed up data entry.BC-Wave2-popup

5. My Business Central Overview – role explorer

Legacy NAV user will remember the ‘Departments’ menu on the ‘old’ windows client that showed all the modules included in the users license/permissions, nicely grouped together by business department. Business Central now includes similar functionality called ‘Role Explore’. From the Role Explorer, you can also access a second overview showing the business features for all roles in the product

BC-Wave2-roleexp

Dynamics 365 Business Central’ Missing Functionality

Microsoft released the brand new cloud version of Dynamics NAV this spring and named it Dynamics 365 Business Central. It was presented as the solution ‘that brings the full power of Dynamics NAV to the cloud”. There are however some differences between NAV & Business Central today.

Because the two platforms share the same code base, differences in functionality usually are caused by arising issues porting the functionality towards the new web-client.

Let’s discuss two important missing functionalities as of today, July 2018.

No ‘Combine Shipments’ report available

Dynamics NAV has a common used functionality to combine shipments for a past period into one or multiple invoices. You can set up customers in a way to combine those shipments automatically on a separate or combined invoice. This functionality is not present in Business Central at time of writing.

The help section however has some references towards this topic, so let’s assume this is a work in progress.

Combine shipment

Missing ‘Comments’ page on Customers, Vendors, Sales Order(lines)

Business Central is currently lacking the ‘Comment’ pages that are scattered throughout Dynamics NAV. Microsoft is stating ‘optimizations for the web client still pending‘ as reason for this lacking functionality. Because we also lack the ‘Notes’ functionality in the new web-client, there is currently no out of the box solutions to store comments on Customers, Vendors, Sales Lines,…. This seems like such a critical omission for a modern cloud based ERP system.

Comments

Conclusion

The missing functionalities described above seem trivial at first and won’t be missed by new customers, they are however critical going forward when Dynamics NAV customers will migrate towards BC. Let’s hope we can welcome them back in the fall release of Dynamics 365 Business Central.

Microsoft Dynamics NAV 2018 BE preview available

You can now go and test the new Microsoft NAV 2018 BE localisation in a docker container. To get started on Docker i’ll refer you to this excellent (as always) blog of Waldo.

To get the BE localisation, simply replace the following code in the navcontainerhelper script:

-devImageName microsoft/dynamics-nav:devpreview `

With

-devImageName microsoft/dynamics-nav:devpreview-be `

This will install the november build of Microsft Dynamics 2018 codename Tenerife.

Export existing flows inside Microsoft Flow

There is a neat little trick inside Microsoft Flow to export existing flows.
We have two export methods available today:

  • Export as .zip file so you can import them in an other environment.
  • Secondly, we can export a flow as JSON format so you can recreate the flow inside Azure Logic Apps.

To do so, simply click the … icon next to your existing flow, and navigate towards the export sub-menu.

Export flow

If you would like to import the flow (when exported as Package), simply click the import button inside the header menu on the ‘My Flows’ page.

Import_flow

Extend Microsoft Dynamics NAV 2017 CRM integration

Microsoft Dynamics NAV 2017 contains some standard CRM (Dynamics 365 for sales) integration tables. This set could be limited if you want to fully integrate your NAV & Dynamics 365 for Sales data. This post will describe how we can sync additional NAV entities towards Dynamics 365, using the standard integration engine.

General

First, let’s have a look at the standard out of the box NAV integration entities we can use. To visualize them, we can navigate towards the ‘Microsoft Dynamics CRM Connection Setup’ page inside NAV and click the ‘Integration Table Mappings’ button inside the ribbon. This button only becomes active if a valid CRM connection is established. Completing the standard setup is outside the scope of the blog, but check this page for an extensive overview.


Assited_Setup_Page

The corresponding page will show us all of the standard NAV/CRM integrations.  We have a focus on master data (Contacts, Items, Customers, Salespersons), parameter tables (Currency, Payment Terms, Shipping Agent,…) and some document interfacing (Sales Invoice header and Sales Invoice line).

Integration_Table_Mappings

When we look at the the source table of the above page, we can see that NAV stores these entities inside the object ‘Integration Table Mapping (5335)’. This will be our starting point to add a new entity.

Sync Sales Quotes

Table mapping

Let’s say we want to sync Sales Quotes from NAV towards Dynamics 365 for Sales. Out of the box only the other way around is supported (from CRM towards NAV), so we’ll need to add this in the Integration Table Mapping.

To achieve this we must create a new record in table Integration Table Mapping (5335), with a link between the ‘Sales Header’ table and the ‘CRM Quote integration’ table. If you would like to sync a custom entity created in CRM, you’ll have to create a CRM integration table in NAV before you can map it inside the Integration Table. To achieve this please follow the steps explained here.

So let’s create a new record in table Integration Table Mapping (5335) called “Sales Quote Header”. We can use Rapid Start to import this new record, because the page won’t allow us to insert data.

Integration_Table_SalesQuoteHeader

We are going to apply a filter towards the linked NAV table, because we only want  to synchronize released sales quotes. Click on the drilldown icon near Table Filter.

Integration_Table_SalesQuoteHeader_Filter

And add the selection inside the filter page.

Integration_Table_SalesQuoteHeader_Filter_Details

So, now we have a table mapping created in NAV with the relevant filter. Next step, mapping fields between Dynamics 365 for Sales and NAV.

Field mapping

Once the Integration Table Mapping record is completed, we can define the field mapping between the NAV Sales Header fields an the CRM Quote table. We can have a look at the out-of-the-box example ‘CONTACT’ and check the logic.

To achieve this we can visualize the fields from within the Integration Table Mapping page and click the ‘Fields’ button.

Integration_Table_Field_Mapping

This table contains the field mapping between NAV and ERP, based on the ID in the source NAV table and the CRM integration table. Source of this data is table ‘Integration Field Mapping (5336)’.

Let’s have a look at the ‘CONTACT’ field mapping:

Integration_Table_Field_Mapping_Contact_Detail

The data structure for this table is quite simple, the ‘Field No’ column contains the NAV field ID and the Integration Table Field is based on the CRM id. In order to make our Quote integration work, we must create a similar mapping for the Sales Header vs CRM Quote table. To achieve this I’ve exported both tables to Excel and mapped them accordingly.

Field_Mapping_NAV_CRM.png

After we mapped the data, we can import the settings with Rapid Start inside table ‘Integration Field Mapping’. When we have a look at the result inside the field mapping page, we can see these combinations:

Field_Mapping_NAV_CRM_Integration_Table

Now we can go ahead and test the synchronization. From the ‘Integration Table Mappings’ page we select the ‘Sales Quote Header’ record and click the ‘Run Full Synchronization’ button.

Integration_Table_Run_Synchronization

Check the ‘Integration Synch. Job log’ page to verify the synchronization result.

We can see the result inside Dynamics for Sales, our NAV quotes are now visible inside the Quotes section.

NAV_Quotes_CRM_Result.png

Conclusion

Without writing any code we are able to push data between NAV and Dynamics 365 for Sales by using the standard integration functionality. Above example is only a starting point, we can extend this functionality by adding the line details for these quotes or apply additional logic with the use of events.

What do you think, pretty neat no?